Create a Dialog Short-Cut Ribbon Button
Challenge:
In the How To 'Create a Workflow Short Cut Ribbon Button' we discussed that users often want to reduce the number of clicks it takes to perform common actions. Running Dialogs from Grids and Forms is no exception. Wouldn't it be nice to provide a 'short-cut' to a specific dialog rather than asking the user to search for it first - especially if this is a dialog that they use more than once a day.
Solution:
This solution involves creating a small javascript webresource that will be used by two ribbon buttons. One from the HomePage and Grid ribbons and one from Form ribbon. In this example, I am going to add the buttons to the contact entity.
- Open the Dialog that you want to provide the short cut to,
and use the 'Copy Link' from the Actions menu. Paste the link
into notepad and you will see something like:
<http://<server>/<OrgName>/sfa/workflow/edit.aspx?id=%7b<Dialog ID>%7d>
- Extract the DialogID and save it for later.
Note: If you move a dialog from one CRM organisation to another via a solution export/import, this ID will be the same on all instances. If you manually create the dialog on each instance, you'll need to update the ID for each instance.
- Create a solution and add the Contact Entity along with the
ribbon button images that you want to use on your button. See
the Getting Started Guide for more information on buttons.
- Add a new 'Web Resource' to your solution and set the type
to JScript.
- Copy the following script into a text file, and then use the
'Upload' button on the web resource, selecting the text file you
just created.
- Give the webresource a name such as 'RunDialog.js' and then save and close.
- Load your new solution into the Ribbon Workbench. See the Getting Started Guide for more information on loading solutions.
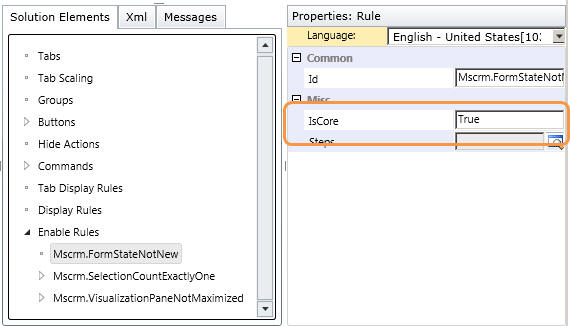
- In the 'Solution Element' panel, add the following
EnableRules and mark each one as 'IsCore=True' in the
properties.
-Mscrm.FormStateNotNew
-Mscrm.SelectionCountExactlyOne
-Mscrm.VisualizationPaneNotMaximized
- Under 'Commands' in the Solution Elements Panel, add two
Commands and name them something like:
-new.contact.RunDialogGrid.Command
-new.contact.RunDialogForm.Command
- Right-Click on the Command
'new.contact.RunDialogForm.Command' and select 'Edit Enable
Rules'
Add the following Enabled Rule:
-Mscrm.FormStateNotNew
This will ensure that the button is only enabled if dialogs can be run on the current record.
- Right-Click on the Command
'new.contact.RunDialogGrid.Command' and select 'Edit Enable
Rules'
Add the following Enabled Rules:
-Mscrm.SelectionCountExactlyOne
-Mscrm.VisualizationPaneNotMaximized (Only add this rule if the entity you are adding the button to supports chart visualisations. If when you publish you get a message indicating that the that you command is dependant on this rule - remove it from your command and re-publish)
This will ensure that the button will only be enabled if there is a single record selected and they can have dialogs run on them.
- This is where the magic happens! We create some commands to
call the javascript.
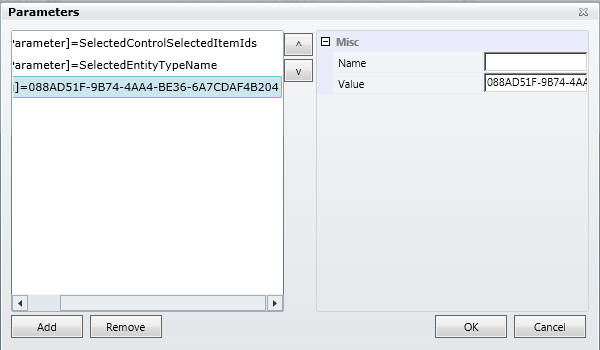
Righ-click on the Command 'new.contact.RunDialogGrid.Command' and select 'Edit Actions'
Add a Javascript Command and set the following properties:
Function Name Develop1_RibbonCommands_runDialogGrid Library Use the lookup button to select the webresource you created above Parameters 1: Type = Crm Parameter, Value = SelectedControlSelectedItemIds
2: Type = Crm Parameter, Value = SelectedEntityTypeName
3: Type = String, Value = Dialog ID found from the Copy Link in the previous steps
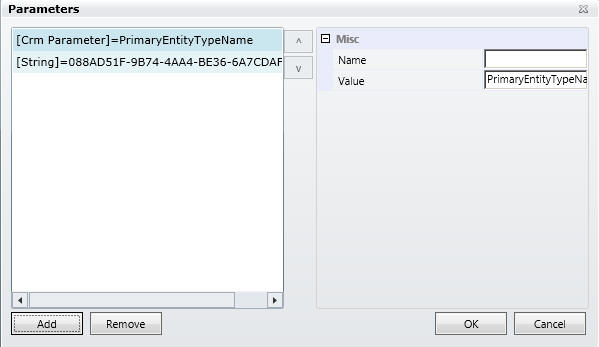
- Righ-click on the Command 'new.contact.RunDialogForm.Command'
and select 'Edit Actions'
Add a Javascript Command and set the following properties:
Function Name Develop1_RibbonCommands_runDialogForm Library Use the lookup button to select the webresource you created above Parameters 1: Type = Crm Parameter, Value = PrimaryEntityTypeName
2: Type = String, Value = Dialog ID found from the Copy Link in the previous steps
Adding the Buttons
- Select the 'Home Page' ribbon using the drop down in the top
right of the design surface.
- Drag a new button on to the 'Process' Group (Or in CRM2013 or later anywhere on the home page command bar).
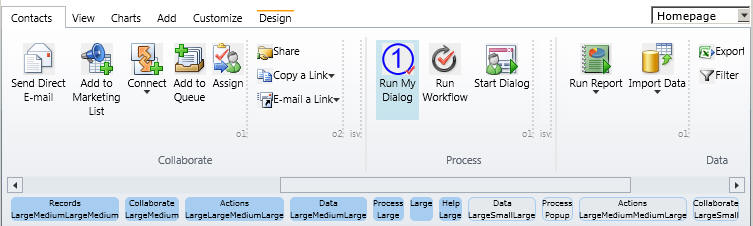
Give your buttons an image, and select the Command 'new.contact.RunDialogGrid.Command'
- Select the 'SubGrid' ribbon and drag a new button into the
'Process' Group (Or in CRM2013 or later anywhere on the sub grid command bar).
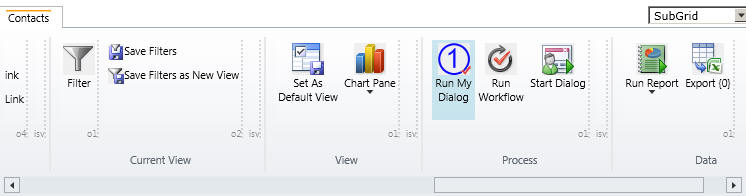
Give your buttons an image, and select the Command 'new.contact.RunDialogGrid.Command'
- Select the 'Form' ribbon and drag a new button into the
'Process' Group (Or in CRM2013 or later anywhere on the form command bar).
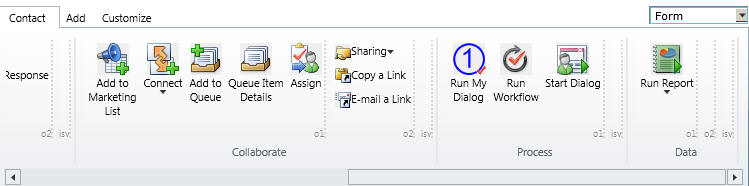
Give your buttons an image, and select the Command 'new.contact.RunDialogForm.Command'
- Click 'Publish'.
- You will now be able to run your chosen dialog from the homepage grid, form
and sub-grids.
// NOTE: This code is unsupported since it is not using the SDK
// This is the only way of exactly mimicking the behaviour of the out of the box
// dialog windows that are reliably sized and positioned
(function() {
Develop1_RibbonCommands_runDialogGrid = function(ids, objectTypeCode, dialogId) {
    if ((ids == null) || (!ids.length)) {
        alert(window.LOCID_ACTION_NOITEMSELECTED);
        return;
    }
    if (ids.length > 1) {
        alert(window.LOCID_GRID_TOO_MANY_RECORDS_IWF);
        return;
    }
    var rundialog = Mscrm.CrmUri.create('/cs/dialog/rundialog.aspx');
    rundialog.get_query()['DialogId'] = dialogId;
    rundialog.get_query()['ObjectId'] = ids[0];
    rundialog.get_query()['EntityName'] = objectTypeCode;
    openStdWin(rundialog,buildWinName(null),615,480,null);
}
Develop1_RibbonCommands_runDialogForm = function(objectTypeCode, dialogId) {
    var primaryEntityId = Xrm.Page.data.entity.getId();
    var rundialog = Mscrm.CrmUri.create('/cs/dialog/rundialog.aspx');
    rundialog.get_query()['DialogId'] = dialogId;
    rundialog.get_query()['ObjectId'] = primaryEntityId;
    rundialog.get_query()['EntityName'] = objectTypeCode;
    var hostWindow = window;
        if (typeof(openStdWin) == 'undefined') {
            hostWindow = window.parent; // Support for Turbo-forms in CRM2015 Update 1
        }
        if (typeof(hostWindow.openStdWin) != 'undefined') {
            hostWindow.openStdWin(rundialog, hostWindow.buildWinName(null), 615, 480, null);
        }
}
})();